
AI Animatics: From Cinematic Storyboard to Moving Pre-Vis
Storyboards aren't going anywhere — sketches are. The frames you board with are now real cinematic shots that become your animatic and your final cut.
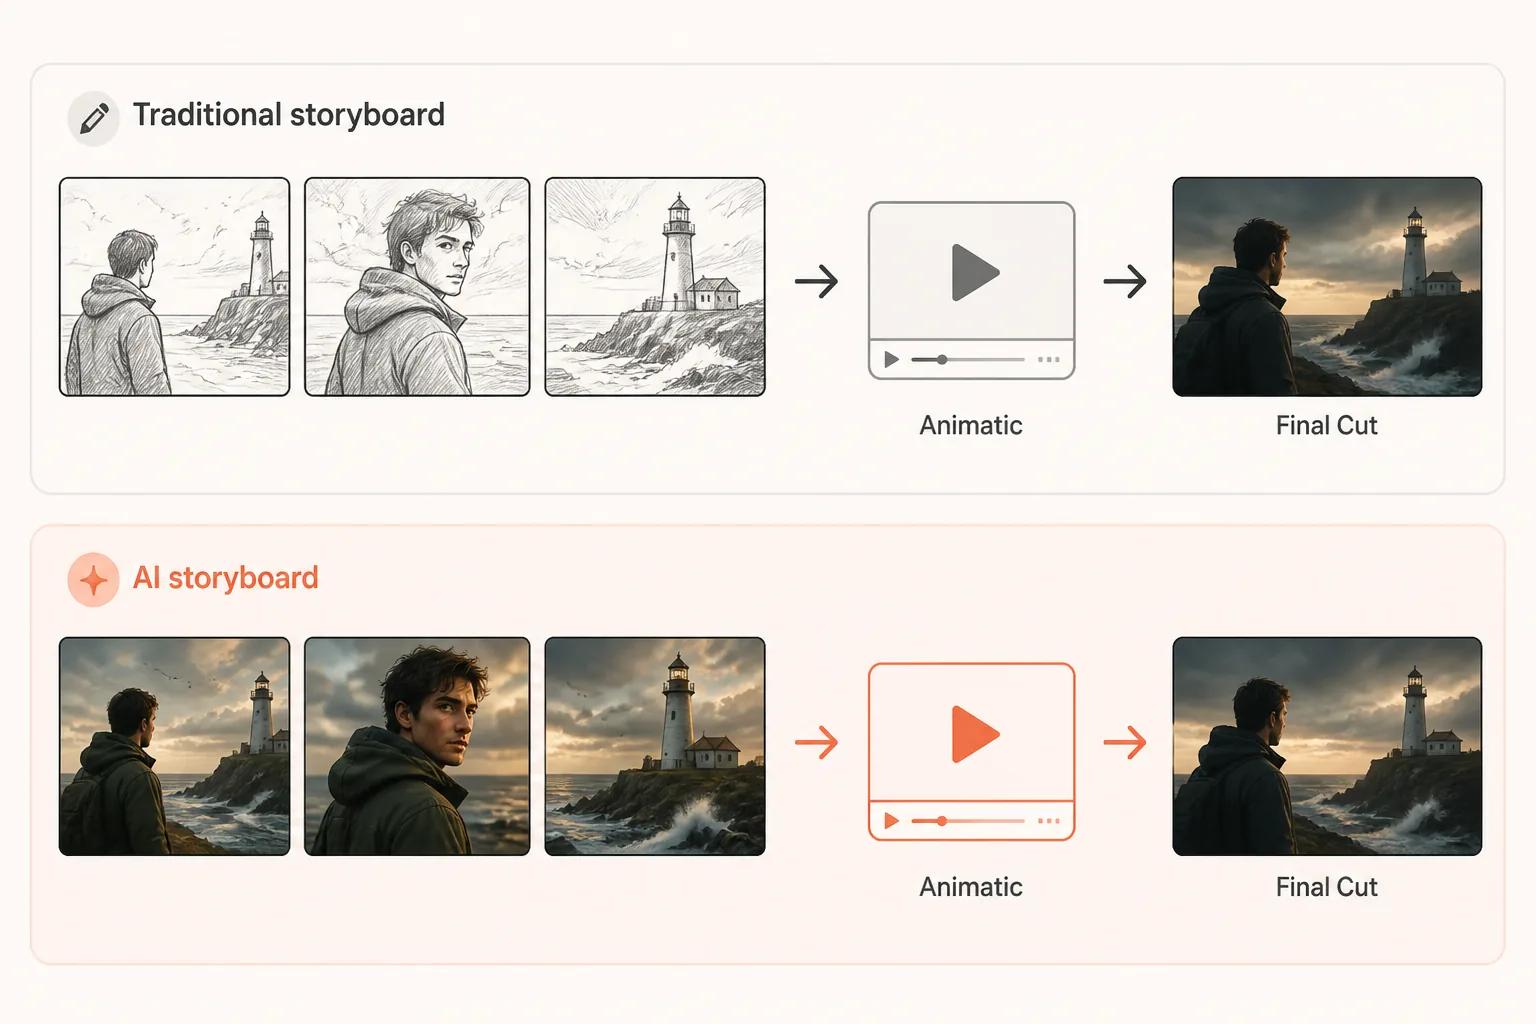
Storyboards aren't going anywhere. They've been the bridge between script and screen for as long as film has existed, and that role hasn't changed. What's changed is the medium. The black-and-white sketches that defined storyboarding for a century are no longer the cheapest way to plan a scene — real cinematic frames are.
The result is a modern pre-production pipeline where the storyboard is made of full-colour AI-generated shots, the AI animatic is those same shots set to time with motion and scratch audio, and the final cut is the same shots again, upgraded. One body of frames, three stages, no translation losses. This guide walks through how that workflow actually runs in 2026, what you need to make it work, and the mistakes that quietly waste hours.
What Is an AI Animatic?
An animatic is a moving pre-visualization of a scene — a sequence of shots set to time, with motion, transitions, and scratch audio, so you can feel how the scene plays before you commit to it.
An AI animatic is the same idea, but the frames are different. Instead of starting from drawn storyboard panels, you generate a cinematic storyboard — full-colour shots in your style, with your characters — and animate those panels on a timeline. The frames are real shots, not sketches, and they double as the foundation of your final cut.
That single change — that the storyboard frames, the animatic frames, and the shipping frames are all the same frames — is what makes the modern workflow faster than traditional pre-production.
Sketches Are Gone — Storyboards Aren't
Storyboarding solved a real problem and still does: figuring out what the scene looks like before anyone commits to making it. Directors agree on shots, blocking, and pacing on paper because doing it on set costs money. That logic hasn't changed.
What's changed is that the cheapest way to board a scene is no longer pencil sketches. Generating a real cinematic frame with AI now costs less time than commissioning a storyboard panel, and it shows you something a sketch can't: lighting, mood, performance, palette — what the scene will actually look like.
That gives you three things you didn't have before:
- One body of frames. Your boarding frames are your animatic frames are your shipping frames. No translation step, no information lost between stages.
- Decisions on the right material. Sketches hide a lot. Cinematic frames force every decision into the open at the moment you're cheapest to change them.
- Real iteration. Regenerating a "panel" means asking for a new image, not redrawing or re-commissioning. So you actually try the alternate version.
The storyboard didn't disappear. It just stopped being made of sketches.
What You Need Before You Start
Don't open a generation tool yet. Three things make the workflow fast; skip any of them and you'll spend the day fighting the tools.
1. A locked script and shot list. Without a shot list, you'll guess at framing and timing while you generate. Five minutes with a shot list — angle, framing, action, duration — saves an hour later. If you're still working on the script, see our guide on screenplay format for AI.
2. Reference images for character and style. Consistency is the single biggest failure mode. If your hero looks slightly different across frames, the animatic will feel wrong even when the timing is right. Lock a reference frame for each main character and a style reference for the world before you generate anything — see the guide to AI character consistency.
3. A clear visual target for the scene. Mood, palette, time of day, lens feel — decide these once, write them into your prompt template, and reuse them on every shot. The frames you board with today are the frames you'll grade and upgrade later, so getting the look right now compounds.
How to Build an AI Animatic, Step by Step
Six steps, the same shape whether your scene is forty seconds or four minutes.
Step 1: Turn Each Shot Into a Generation Prompt
Take every shot in your shot list and write a prompt that captures: the subject and action, the framing (wide, medium, close-up), the lighting and mood, and the visual style. Keep prompts to 30–60 words and reuse the same character and style references across all of them.
This is where most of the quality comes from. A vague prompt produces a generic frame. A specific prompt — same camera, same character, same world — produces a frame that belongs to your film.
Step 2: Generate the Cinematic Storyboard
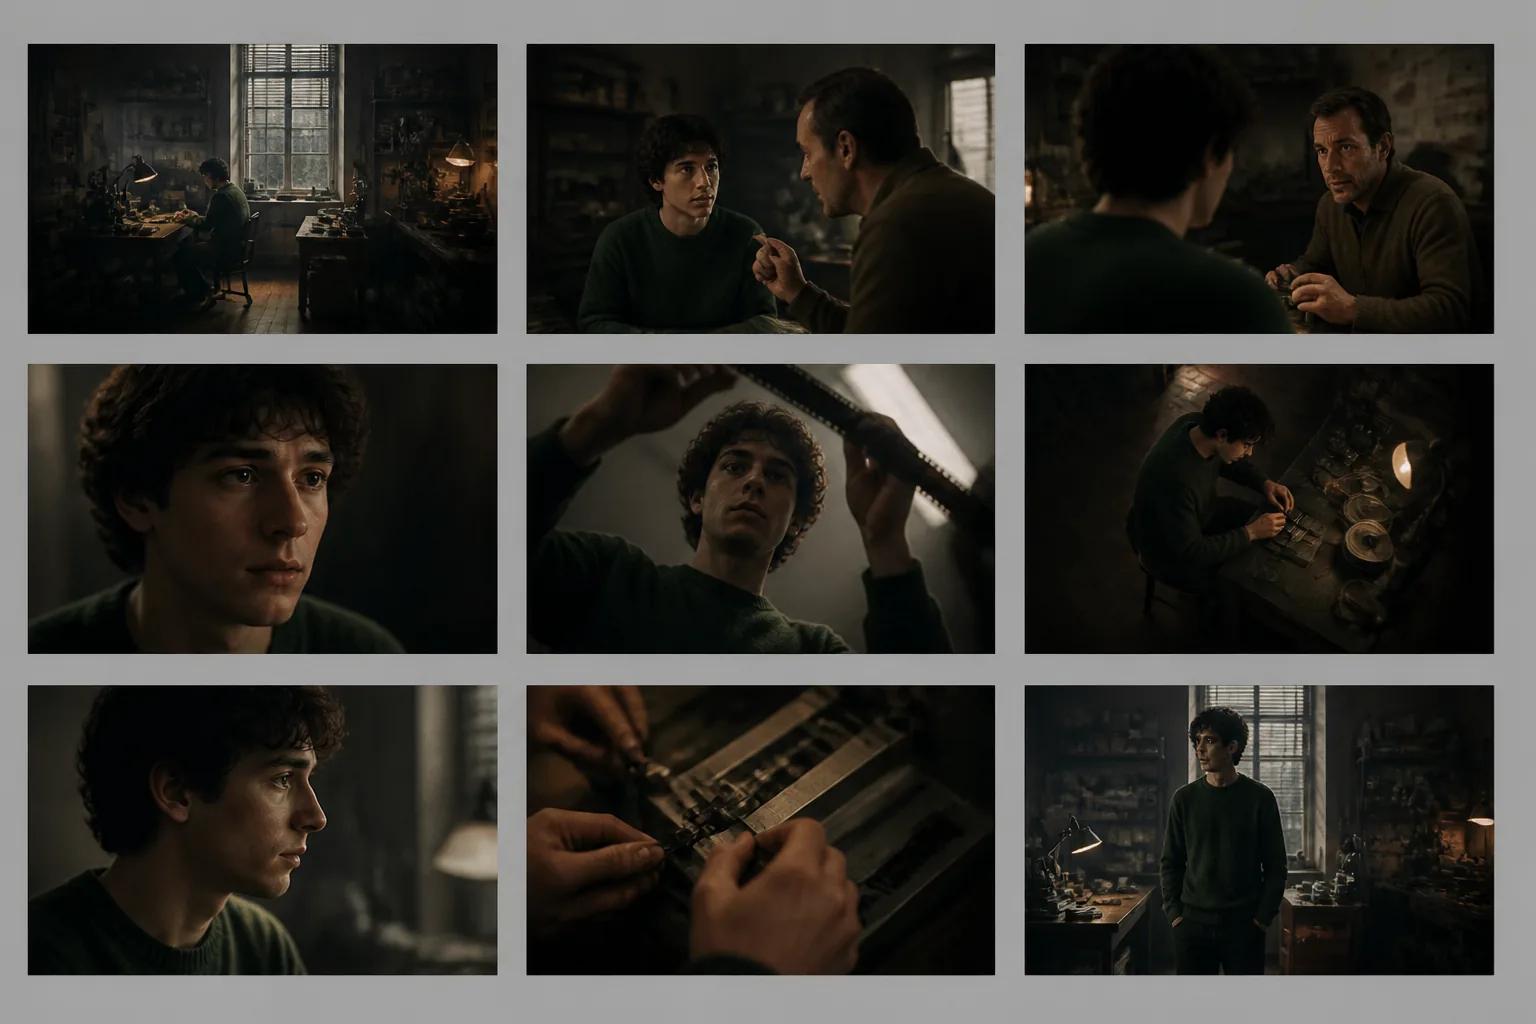
Generate one cinematic frame per shot. Don't try to generate motion yet. You want stills first because they're cheap, fast, and the place where you fix character drift, framing problems, and tone before they get baked into video.
Lay the full set out together. This is your storyboard now — colour, in style, with your characters. If shot 4's hero looks like a different person than shot 2's hero, fix it before you animate. These frames are the foundation of both the animatic and the final cut, so getting them right pays back twice.
Step 3: Animate Each Beat
Now turn each storyboard frame into a short clip. Most modern AI video tools let you take a still and add motion via a short prompt: "slow dolly in, hero turns head left," "static frame, smoke drifts across foreground," "whip pan to reveal door."
Keep clips short — usually two to four seconds each. The animatic is about communicating timing and intent, not shipping finished VFX.
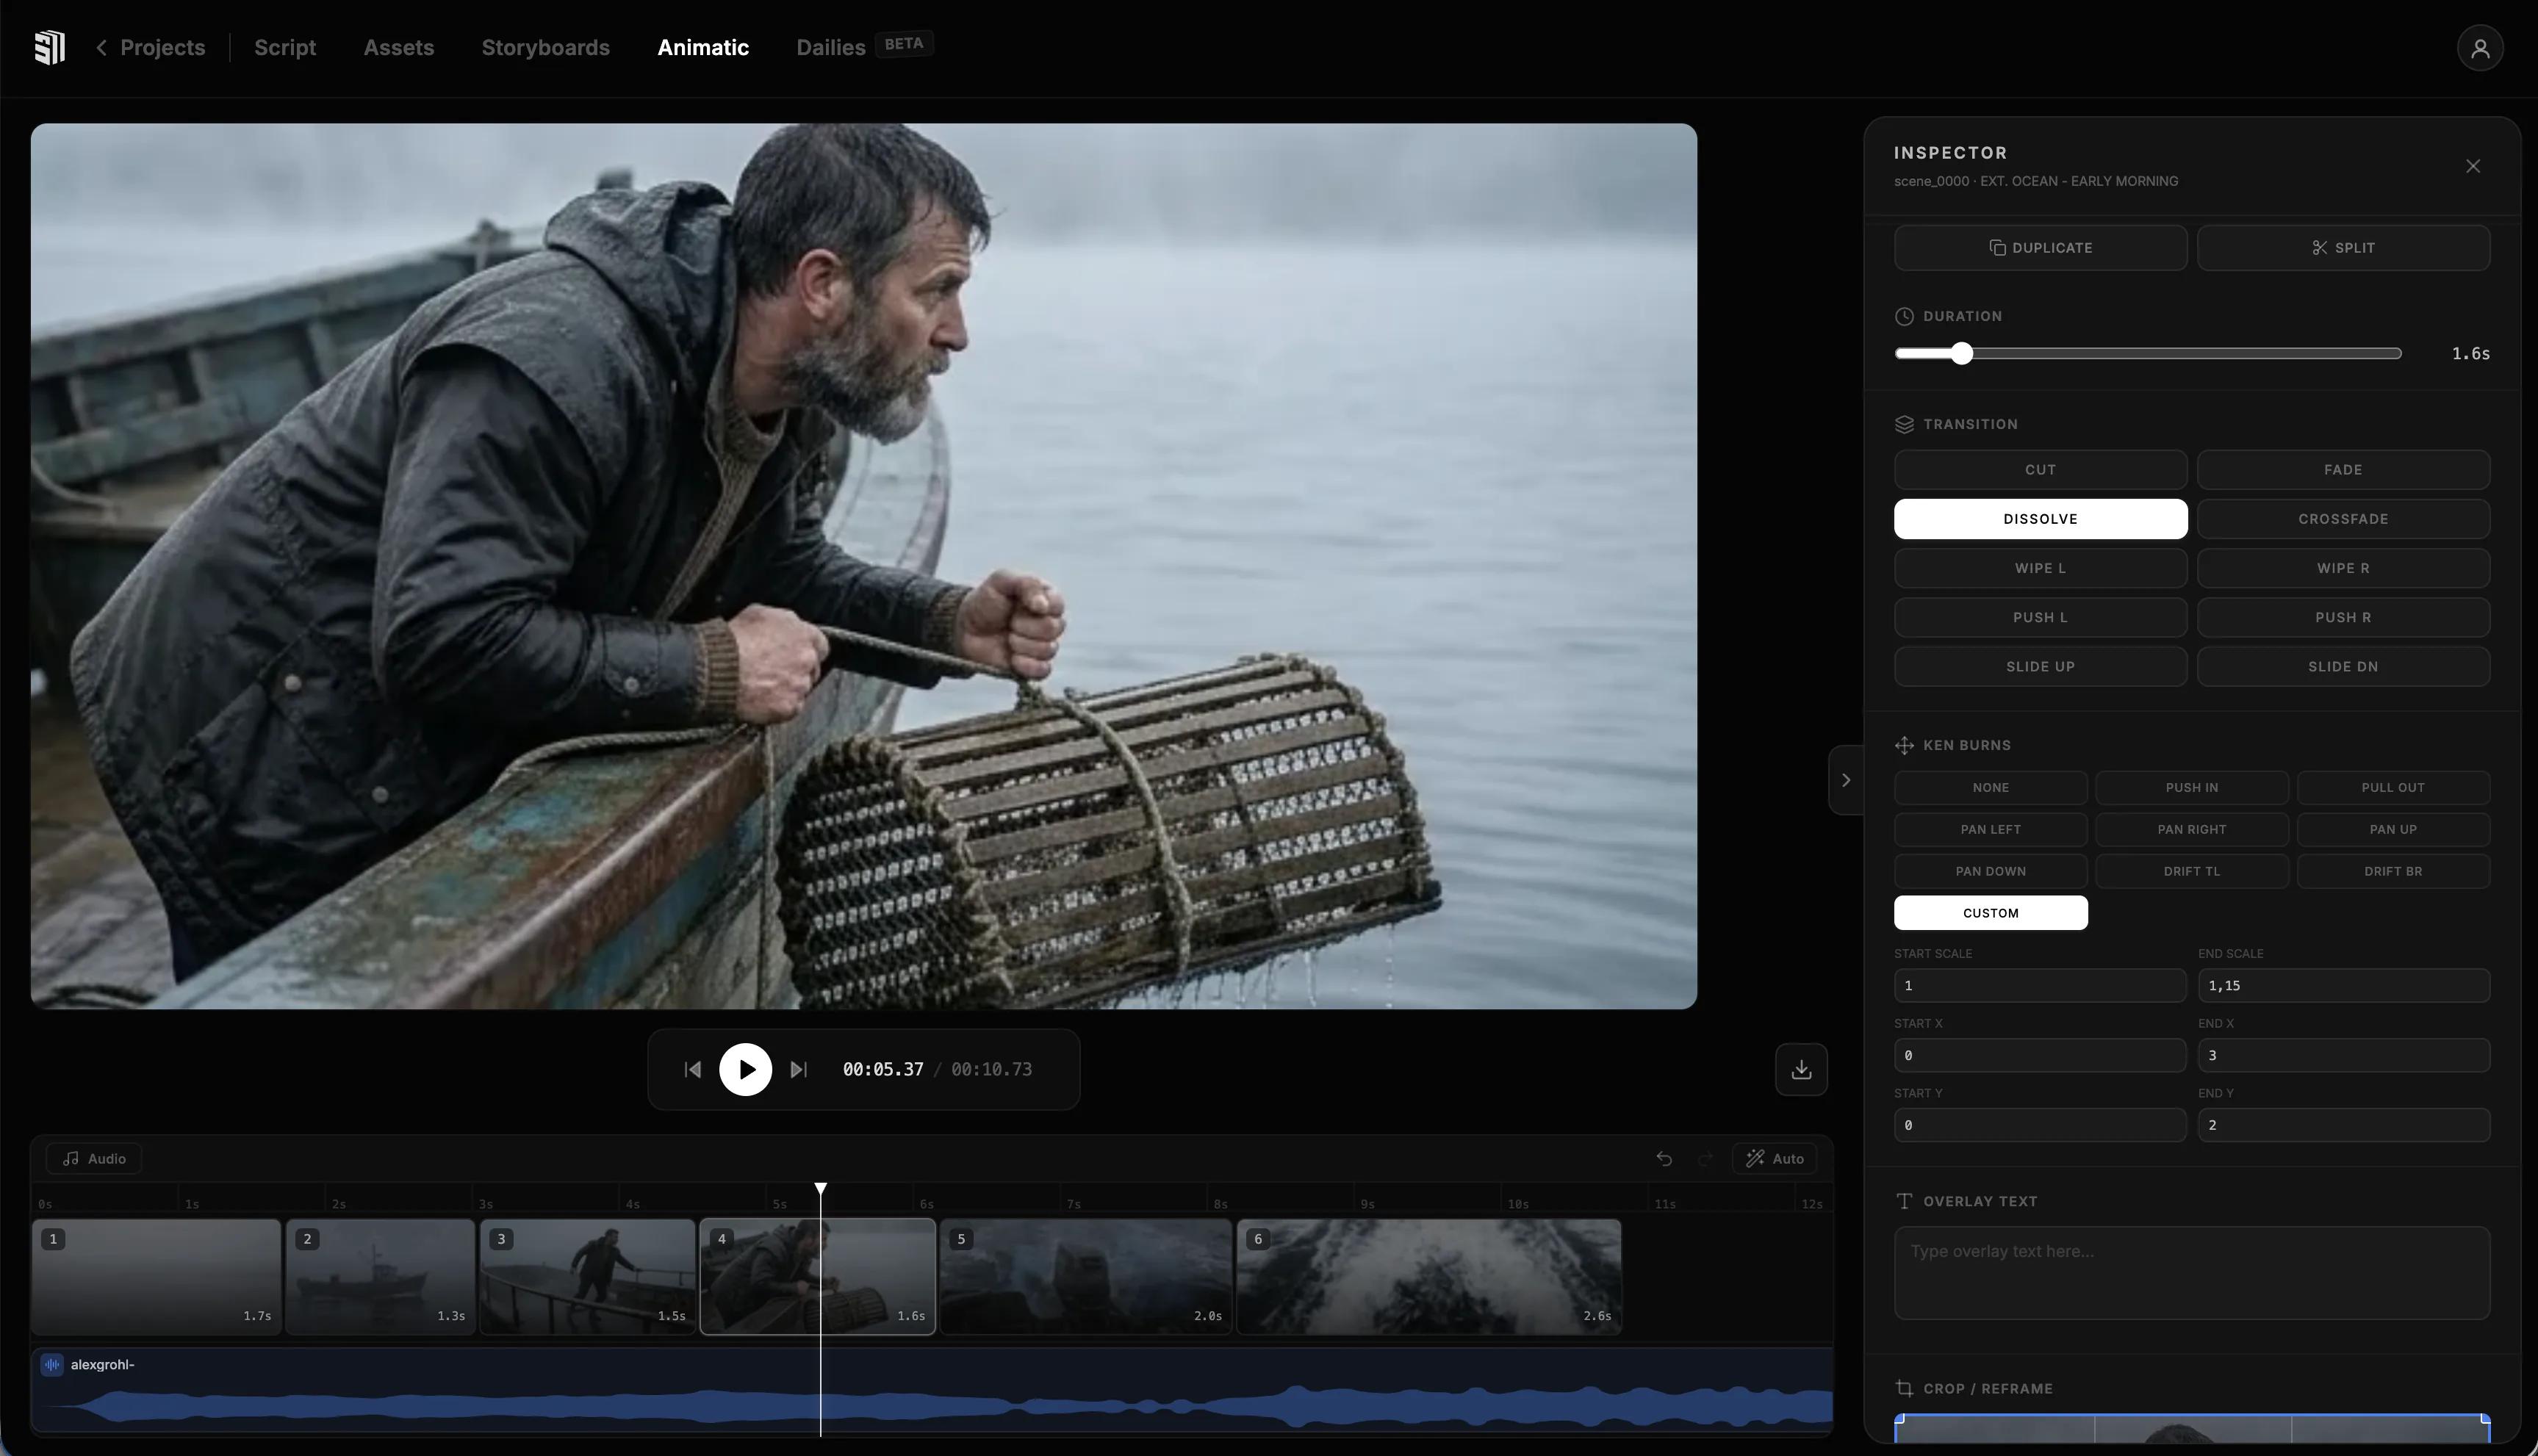
Step 4: Sequence and Time the Cuts
Drop every clip onto a timeline in the order from your shot list. Trim each one to the duration you wrote down. Now play it back end to end.
This is the moment the animatic earns its keep. You will discover, immediately, that some cuts land and others don't. The reveal that worked in your head feels rushed. The dialogue beat needs another half-second to breathe. The action sequence has one shot too many.
Cut, swap, retime. Then play it again.
Step 5: Add Scratch Audio
Audio is where the animatic stops feeling like a slideshow and starts feeling like a film. Add three layers:
- Scratch dialogue. Either record yourself reading the lines or use AI voice generation for a placeholder. Don't worry about performance yet — you're checking whether the timing works.
- Sound effects. A door slam, a footstep, a phone ring. Even one or two sound effects per scene lift the whole thing.
- A temp music bed. Royalty-free or AI-generated. Scoring an animatic is an unreasonably useful exercise — it tells you what the scene is about emotionally.
Step 6: Review, Get Notes, Iterate — Then Upgrade
Watch the full animatic with fresh eyes — ideally a day later or with a trusted collaborator. Look for confusing geography, dead air, missing reaction shots, and whether the emotional beats land.
Iterate fast. The whole point of the animatic is that fixing it is cheap. Regenerate two frames, retime three cuts, swap the music. Watch again.
Once the cut works, the same storyboard frames graduate from animatic to final cut — upgraded with longer clips, finished motion, real audio, and a colour grade. The animatic isn't thrown away; it becomes the final film.
What to Look For in an AI Animatic Tool
Not every AI video tool is built for this. Some generate beautiful single shots but choke when you need ten consistent ones. The features that actually matter:
| Feature | Why It Matters |
|---|---|
| Character consistency | The same hero needs to look like the same hero across every frame |
| Style control | Lighting, palette, and texture should hold across the whole storyboard |
| Scene-to-scene workflow | Generating ten frames one at a time is the slow way to fail |
| Built-in timeline | Cutting and retiming should live next to generation, not in a separate app |
| Scratch audio support | Voice, SFX, and music in the same place saves hours |
| Storyboard-to-final upgrade path | The same frames should graduate from boarding to animatic to final cut |
Storytella was built specifically around this end-to-end workflow — script to scenes to audio to final cut, with character consistency and style control applied across the whole project. The cinematic storyboard, the animatic, and the final cut all live on the same timeline; what changes is how polished the clips are.
Common Mistakes to Avoid
A few mistakes show up over and over when filmmakers first try AI animatics. Most of them are easy to dodge once you know to look:
- Boarding like it's still sketches. It isn't. Generate the storyboard at the look you want to ship — palette, lighting, lens feel. The look you set here is the look you keep through the animatic and the final cut.
- Animating before the still is right. If the storyboard frame is wrong, motion makes it worse. Lock the still first.
- Skipping the shot list. Without timing written down, you'll guess at clip lengths and the cut will feel arbitrary. Five minutes with a shot list saves an hour on the timeline.
- Inconsistent characters. Single most common reason an animatic feels off. Use a reference frame for every main character on every generation.
- Ignoring audio. A silent animatic at 24 frames per second is a slideshow. Even thirty seconds of scratch dialogue and a temp track changes the entire experience.
- Polishing too early. The animatic is the cheapest place to make decisions. Don't spend an hour grading a frame you might cut entirely tomorrow.
- Not sharing it. The animatic is the cheapest place to get notes. Send it to one trusted person before you upgrade anything to final.
FAQ
How long should an AI animatic take to make?
For a single scene of 30–90 seconds, plan for half a day to a full day end-to-end the first time you do it — script and shot list, cinematic storyboard, sequencing, scratch audio. Once you've done it a few times and your prompt template is dialled in, a one-minute scene fits comfortably into an afternoon.
How is an AI animatic different from a traditional storyboard?
Storyboards still exist. The frames just stopped being sketches. An AI animatic is your cinematic storyboard set in motion — same frames, now sequenced and timed with motion and audio. Storyboards answer what's in the shot; AI animatics answer whether the scene works with the actual frames you'll ship.
Are storyboards becoming obsolete?
No — sketches are. The storyboard step is alive and well; what's gone is the assumption that boarding has to mean pencil panels. With AI, the cheapest way to board is to generate the cinematic frame itself, which means your storyboard, your animatic, and your final cut all draw from the same body of frames.
Can I make an animatic without a finished script?
You can, but you shouldn't. Without a script, you'll burn cycles regenerating frames when the story changes. Lock the script, write the shot list, then build the storyboard. Each step is cheaper than the one after it.
What if my characters keep looking different in each frame?
Lock a reference image for every main character before you generate anything, and feed that reference into every shot. If your tool supports character consistency natively, Storytella.ai handles this across an entire project — same face, same style, every scene.
Do animatics still need scratch dialogue if my film is mostly visual?
Yes. Even silent scenes have rhythm, and scratch ambience or temp music does the same job dialogue would. The point is to feel the timing, and silence on a timeline rarely feels like the silence you intended.
Does the animatic become the final film?
Often, yes. Because the storyboard frames are already cinematic, upgrading the animatic to final usually means longer clips, finished motion, real audio, and a colour grade — not regenerating from scratch. Plenty of indie filmmakers and content creators are now going straight from animatic to final without a traditional production stage in between.
Conclusion
An animatic is the cheapest version of your film, which makes it the most valuable one to get right. It's where pacing reveals itself, where dead beats get caught, and where you decide what the scene actually is.
What AI changed isn't the role of the storyboard or the animatic — it's the medium. The sketches are gone. The frames you board the scene with are the same frames that become the animatic and, eventually, the final cut. Build them once, sequence them, time the cuts, add scratch audio, then upgrade what works. Iterate fast, get notes, and let the animatic become the final film.
Try Storytella.ai and go from script to a moving cinematic animatic in an afternoon — character consistency, scene sequencing, and scratch audio in one workflow, with cinematic frames boarding the scene from the start.
Your story awaits
The set is ready for you.
Turn your screenplay into stunning storyboards and animatics in minutes — not months. No drawing skills required.
Free to start · No credit card required · Cancel anytime