
Lighting and Mood: Directing AI for the Look You Want
A hands-on guide to telling AI exactly what lighting you want — so every scene feels intentional, not random.
Lighting is what separates a flat, forgettable image from a scene that makes people feel something. In traditional filmmaking, a cinematographer spends hours placing lights, adjusting color gels, and shaping shadows. With AI video generation, you skip the physical setup — but the creative decisions stay the same.
The problem is that most AI-generated footage looks generically bright and evenly lit. Not because the tools can't do better, but because most prompts don't ask for anything specific. If you want AI lighting that feels cinematic, you need to direct it the way a DP would: with intention.
This guide walks you through how to control lighting, mood, and atmosphere in AI-generated video — step by step, with the vocabulary and techniques that actually move the needle.
Why Lighting Matters More Than Resolution
A 4K image with flat lighting looks worse than a grainy 720p shot with beautiful contrast. That's not opinion — it's how human perception works. We read mood from light and shadow before we register detail.
AI video generators can produce sharp, high-resolution output by default. What they can't do on their own is decide how a scene should feel. That's your job. When you specify lighting in your prompts, you're doing the creative work that turns output into cinematography.
Platforms like Storytella.ai let you apply style control across an entire production, which means the lighting direction you set carries through every scene — not just one frame.
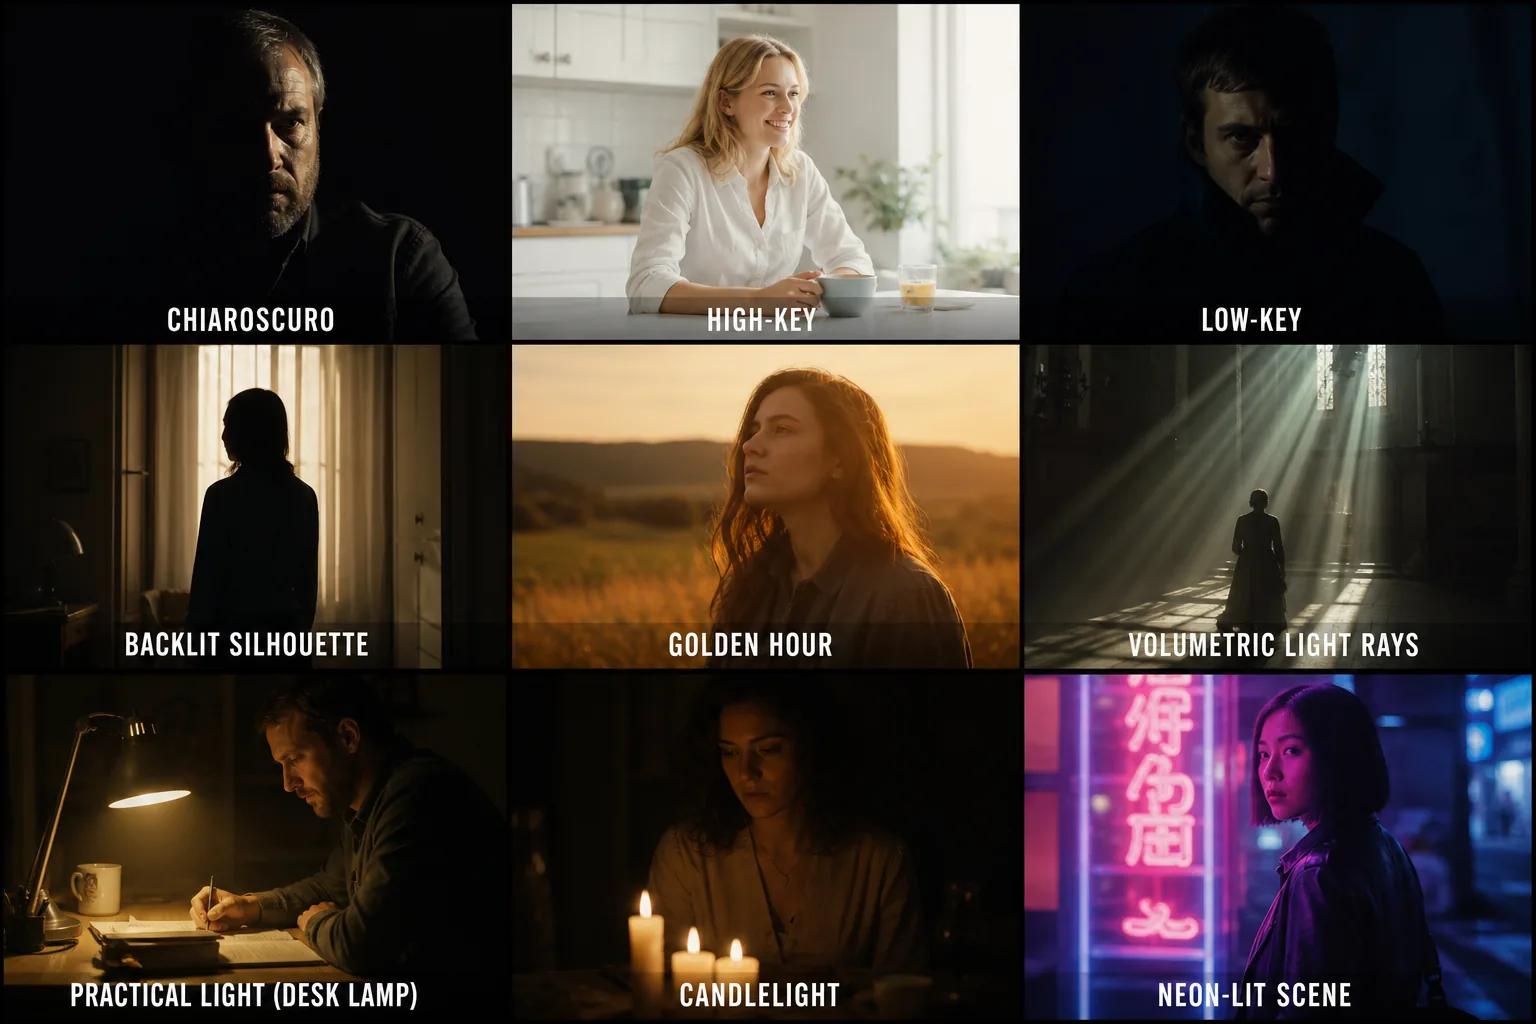
The Lighting Vocabulary AI Actually Understands
AI models respond to specific cinematography terms. Here are the ones that consistently produce results:
| Term | What It Does | Best For |
|---|---|---|
| Key light | Main light source | Establishing the primary direction of light |
| Backlight / rim light | Light from behind the subject | Separating subject from background, creating halos |
| Chiaroscuro | Strong contrast between light and dark | Drama, noir, tension |
| High-key lighting | Bright, even, minimal shadows | Comedy, romance, corporate |
| Low-key lighting | Dark with deep shadows | Horror, thriller, mystery |
| Practical lights | Visible light sources in frame (lamps, candles, screens) | Naturalism, intimacy |
| Volumetric light | Visible light rays through haze or dust | Atmosphere, epic scale |
| Golden hour | Warm, soft, directional sunlight | Warmth, nostalgia, beauty |
| Motivated lighting | Light that appears to come from a logical source | Realism |
Step 1: Define the Emotional Tone First
Before you touch a prompt, answer one question: What should the audience feel in this scene?
Lighting exists to serve emotion. Work backward from the feeling:
- Tension or danger → low-key lighting, hard shadows, cool desaturated tones
- Hope or new beginning → golden hour, warm backlight, soft shadows
- Isolation or sadness → single overhead practical light, muted palette, deep shadows
- Energy or chaos → mixed color temperatures, neon practicals, fast contrast shifts
- Intimacy or comfort → warm practicals (candles, lamps), shallow depth of field, soft light
Write the emotion in your prompt explicitly. "A tense interrogation scene" tells the AI more about lighting than "a room with a table and two chairs."
Step 2: Choose a Lighting Setup
Once you have the emotion, pick a lighting approach. In traditional filmmaking, the gaffer and DP work together on this. In AI, you're both.
Three-point lighting is the default for most talking-head or dialogue scenes: key light at 45 degrees, fill light opposite at lower intensity, backlight from behind. If you want something more stylized, break the rules on purpose.
Here's a prompt structure that works:
[Subject and action], [lighting setup], [light quality], [shadow behavior], [color temperature], [mood], [visual style]
Example prompt: "A detective reviewing case files at a desk, single hard key light from a desk lamp camera left, deep shadows on the right side of his face, warm amber from the lamp contrasting cool blue moonlight through a window behind, noir mood, photorealistic, 35mm film grain"
That's a lighting brief, not a scene description. The more specific you are about light, the less generic the output.
Step 3: Specify Color Temperature and Palette
Color temperature is measured in Kelvin, but AI doesn't need the numbers — it needs the words:
- Warm (2700K–3500K): candlelight, tungsten, golden hour → amber, orange, gold
- Neutral (4000K–5000K): overcast daylight, fluorescent → white, slight green
- Cool (5500K–8000K): shade, blue hour, moonlight → blue, steel, silver
The most cinematic scenes mix temperatures. A warm practical light on the subject's face against a cool blue background creates visual separation and depth without any post-production.
In your prompts, name the colors explicitly: "warm amber key light with cool blue fill" beats "cinematic lighting" every time.

Step 4: Control Shadows and Contrast
Shadows are half the image. Without them, scenes look flat — like a corporate headshot or a sitcom set. Cinematic lighting is defined as much by what's hidden as what's revealed.
Hard shadows come from small, direct light sources (bare bulb, spotlight, direct sun). They create sharp edges, high drama, and visual tension.
Soft shadows come from large, diffused sources (overcast sky, bounced light, large softbox). They create gentle transitions, flattering skin, and a calmer mood.
Tell the AI which you want:
- "Hard directional shadows" → drama
- "Soft diffused light, minimal shadows" → comfort
- "Deep shadow on one side of the face" → mystery
- "Shadow-filled room with a single pool of light" → isolation
If you're building a full project in Storytella.ai, setting a style reference that includes shadow behavior means every scene maintains the same contrast ratio — so a night scene and a day scene still feel like they belong to the same film.
Step 5: Add Atmosphere and Depth
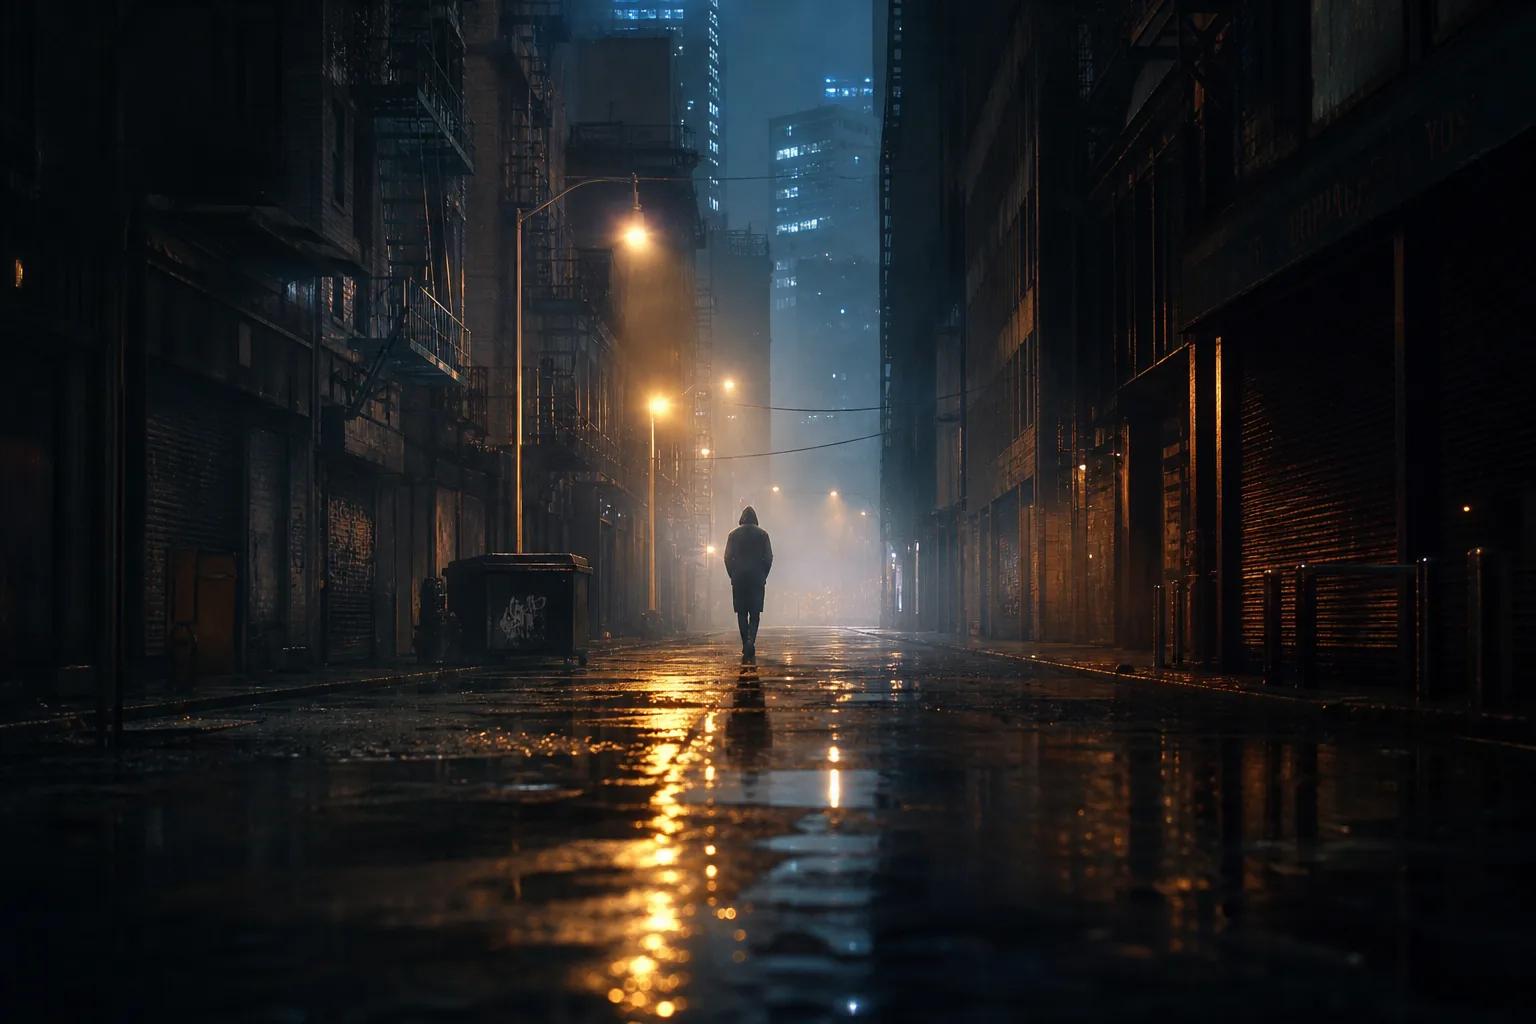
The final layer is atmosphere: haze, fog, dust, rain, or smoke that makes light visible in the air. This is what turns flat lighting into three-dimensional space.
Volumetric light — light rays you can see — is the single most effective keyword for cinematic AI output. It works because it forces depth: the light has to pass through something to become visible, which automatically creates foreground, midground, and background separation.
Other atmosphere keywords that work well:
- "Haze" or "atmospheric haze" — subtle, professional
- "Dust particles in light" — practical, grounded
- "Fog" — heavy mood, reduces visibility
- "Smoke" — edgy, stylized
- "Rain on glass" — reflections, distortion, melancholy
Putting It All Together: Before and After
Here's the difference direction makes.
Generic prompt: "A woman sitting at a café"
Directed prompt: "A woman sitting alone at a small café table by the window, late afternoon golden hour light streaming in from camera right, warm highlights on her face and hands, cool shadow on the far side, steam rising from her coffee catching the light, shallow depth of field, soft bokeh of passing pedestrians outside, nostalgic mood, photorealistic, 50mm lens"
The first gives you a stock photo. The second gives you a scene from a film. The difference isn't more words — it's more direction. You told the AI where the light comes from, what temperature it is, how shadows fall, and what mood to aim for.
That's directing. No lights, no crew, no budget — just clarity about what you want to see.
FAQ
Do I need to know traditional cinematography to direct AI lighting?
Not formally. But learning terms like key light, backlight, and color temperature makes your prompts dramatically more effective. Think of it as learning a handful of useful words in a new language — you don't need fluency, just enough to be specific.
What's the most impactful single keyword for cinematic AI lighting?
"Volumetric light" consistently produces the biggest improvement. It adds depth, atmosphere, and a sense of physical space that flat lighting can't achieve.
How do I keep lighting consistent across multiple AI-generated scenes?
Use the same lighting description as a base for every prompt, then adjust details per scene. Storytella.ai handles this through style control that applies across your entire production, so you set the look once rather than re-describing it every time.
Can AI replicate specific film looks — like Blade Runner or Moonlight?
Yes, if you describe the lighting characteristics rather than just naming the film. Instead of "Blade Runner lighting," try "neon-lit rain-soaked streets, cool blue and magenta practicals, hard contrast, volumetric haze, noir mood." The descriptive version works better because it gives the AI concrete visual instructions.
Why does my AI footage always look flat even when I ask for cinematic lighting?
Usually because the prompt is too vague. "Cinematic lighting" is subjective — the AI defaults to something safe and bright. Replace it with specifics: light direction, shadow depth, color temperature, and atmosphere. The more precisely you describe the light, the less generic the result.
Should I use warm or cool lighting for dramatic scenes?
It depends on the emotion. Cool tones emphasize tension, isolation, or unease. Warm tones suggest urgency, danger in a contained space, or emotional intensity. The most dramatic scenes often mix both — warm on the subject, cool in the environment — to create visual contrast that heightens the mood.
Conclusion
Directing AI lighting isn't about learning a new tool. It's about applying the same principles that cinematographers have used for a century — key light placement, shadow control, color temperature, and atmosphere — to a new medium.
The difference between flat AI output and cinematic AI output comes down to specificity. Tell the AI where the light comes from, how hard or soft it falls, what color it is, and what mood it serves. That's the entire method.
If you're building a full project — short film, series, or even a single polished scene — platforms like Storytella.ai let you set that lighting direction once and carry it through every frame. No crew, no physical lights, no reshoots. Just your creative vision applied consistently from scene to scene.
Start directing your scenes at Storytella.ai — from lighting to final cut, no crew required.
Your story awaits
The set is ready for you.
Turn your screenplay into stunning storyboards and animatics in minutes — not months. No drawing skills required.
Free to start · No credit card required · Cancel anytime